
Project Tigger
+3
Fahren
griz
alsieboy
7 posters
www.firebladeriders.org :: Fireblade Knowledgebase and Tech Help :: Projects/Streetfighters/Modifications
Page 1 of 1

Project Tigger
![]() by alsieboy Wed 05 May 2010, 12:48
by alsieboy Wed 05 May 2010, 12:48
Postie brought a bundle of goodies this morning, so thought I would make a gentle start while the pain was at controlable levels this morning.
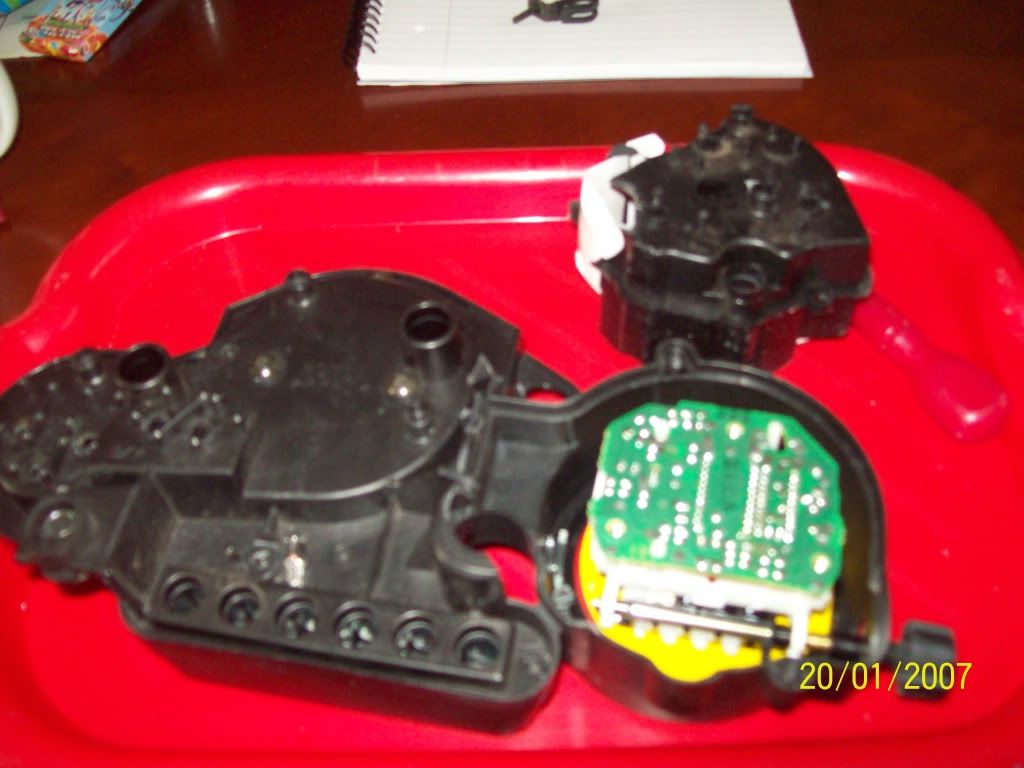
Clocks arrived so decided to see if the internals could be swapped over...
Original clocks..

Replacement clocks...

rear of speedo on the original clocks was smashed....

tip for you make a note of the wiring if your are going to attempt this cos it's not always that clear where the wires go..and seperate the screws cos there are different lengths too..

Broken part of casing removed and the internals are intact...happy days..
When removing the speedo dont forget the mileage reset roller which is held on with a very small cross head screw....

New clocks are split and the casing put to one side..

now the internals of the new clocks can be removed..

and replaced with the original internals

decided to re-use my original wiring loom...

Wiring all back in place

And voila.....refurbished clocks...

Anyone have any use for this little lot...free to a good home

Clocks arrived so decided to see if the internals could be swapped over...
Original clocks..
Replacement clocks...
rear of speedo on the original clocks was smashed....
tip for you make a note of the wiring if your are going to attempt this cos it's not always that clear where the wires go..and seperate the screws cos there are different lengths too..
Broken part of casing removed and the internals are intact...happy days..
When removing the speedo dont forget the mileage reset roller which is held on with a very small cross head screw....
New clocks are split and the casing put to one side..
now the internals of the new clocks can be removed..
and replaced with the original internals
decided to re-use my original wiring loom...
Wiring all back in place
And voila.....refurbished clocks...
Anyone have any use for this little lot...free to a good home

alsieboy- MotoGP Legend
- Number of posts : 1936
 Age : 56
Location : Pontypool
My bike(s) : CBR900RR Urban Tiger, Subaru Impreza WRX STI Type UK
Registration date : 2007-08-14

griz- MotoGP Legend
- Number of posts : 1928
Age : 54
Location : Cheddar
My bike(s) : 93 Blade Streetfighter & a 96 Engineless Blade, soon to become 1 & a 95 GPZ1100 Grand tourer which is looking for a new home! lol
Registration date : 2007-08-08
Re: Project Tigger
![]() by alsieboy Wed 05 May 2010, 16:44
by alsieboy Wed 05 May 2010, 16:44
Deciced for the mid panels it's going to be more cost effective to respray them sandy beige metallic and shell out for the decals. Decal costs £70 a side as apposed to £200 + vat for a replacement mid panel. Had this panel kicking around the garage for a few years, seemed a shame to attatck it and remove the decals, but it's a mint straight panel which will paint up nice..
attacked it with a hairdrier to soften up the decal and it came off easily...
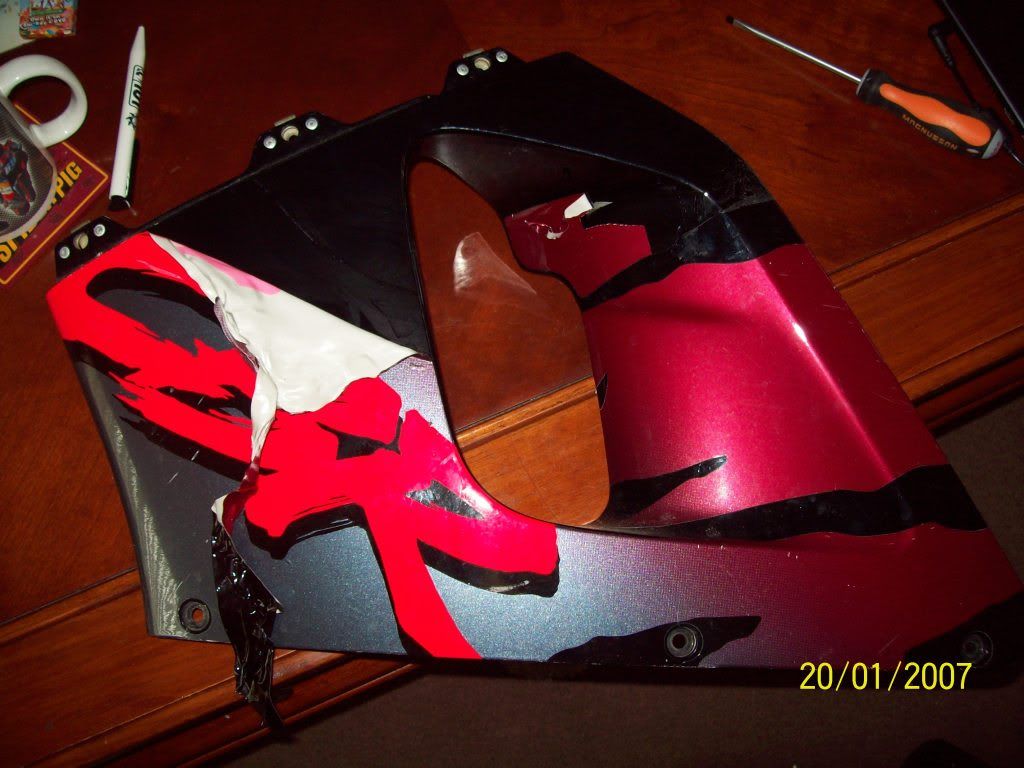

That's the right hand side mid panel sorted...
attacked it with a hairdrier to soften up the decal and it came off easily...
That's the right hand side mid panel sorted...
alsieboy- MotoGP Legend
- Number of posts : 1936
Age : 56
Location : Pontypool
My bike(s) : CBR900RR Urban Tiger, Subaru Impreza WRX STI Type UK
Registration date : 2007-08-14
Re: Project Tigger
![]() by alsieboy Fri 07 May 2010, 13:13
by alsieboy Fri 07 May 2010, 13:13
Got the fairing brace at last with a complete set of fairing brackets for £40..
Happy days, going to be slow to update at first untill my back gets better, but looking forward to ripping it to bits and making a start proper
Happy days, going to be slow to update at first untill my back gets better, but looking forward to ripping it to bits and making a start proper
alsieboy- MotoGP Legend
- Number of posts : 1936
Age : 56
Location : Pontypool
My bike(s) : CBR900RR Urban Tiger, Subaru Impreza WRX STI Type UK
Registration date : 2007-08-14
Re: Project Tigger
![]() by Guest Fri 07 May 2010, 17:06
by Guest Fri 07 May 2010, 17:06
Nice one Al, being busy on the bike should help dull the pain a bit. Worked for me!

Guest- Guest
Re: Project Tigger
![]() by Fahren Fri 07 May 2010, 17:17
by Fahren Fri 07 May 2010, 17:17
good work!! look forward to the bit on adding the decals, mine are chipped and sorry looking on oneside so need to replace them.
Least now i know how best to remove them
Least now i know how best to remove them

Fahren- MotoGP Rider
- Number of posts : 827
Age : 57
Location : Cumbria UK
My bike(s) : CBR900RRX
Registration date : 2010-04-12
Re: Project Tigger
![]() by alsieboy Fri 07 May 2010, 17:36
by alsieboy Fri 07 May 2010, 17:36
Fahren wrote:good work!! look forward to the bit on adding the decals, mine are chipped and sorry looking on oneside so need to replace them.
Least now i know how best to remove them
The mid panel decals work out at £180.10 the pair inc vat, compaired to £428.08 inc vat for a new pair of mid panels. Given that the decal covers 95% of the panel, worth going that route.
alsieboy- MotoGP Legend
- Number of posts : 1936
Age : 56
Location : Pontypool
My bike(s) : CBR900RR Urban Tiger, Subaru Impreza WRX STI Type UK
Registration date : 2007-08-14
Re: Project Tigger
![]() by Fahren Fri 07 May 2010, 22:25
by Fahren Fri 07 May 2010, 22:25
even cheaper than buying second hand ones that might require re-spray!!...if u look at my mini pic its the lower panel purple triangle decal thats taken the worst damage from stone chips etc...(not that u can see it in that small pic lol
Fahren- MotoGP Rider
- Number of posts : 827
Age : 57
Location : Cumbria UK
My bike(s) : CBR900RRX
Registration date : 2010-04-12
Re: Project Tigger
![]() by danidge Sat 08 May 2010, 07:33
by danidge Sat 08 May 2010, 07:33
are you going to spray the panels yourself? how are you going to get the colour match exactly the same?

danidge- MotoGP Rider
- Number of posts : 913
Age : 34
Location : felixstowe
My bike(s) : cbr900rr urban tiger - sold now have an awesome RR4
Registration date : 2009-02-28
Re: Project Tigger
![]() by alsieboy Sat 08 May 2010, 09:41
by alsieboy Sat 08 May 2010, 09:41
I can get the sandy beige metalic and the claret, perfect colour match through a contact in the paint trade
alsieboy- MotoGP Legend
- Number of posts : 1936
Age : 56
Location : Pontypool
My bike(s) : CBR900RR Urban Tiger, Subaru Impreza WRX STI Type UK
Registration date : 2007-08-14
Re: Project Tigger
![]() by alsieboy Tue 11 May 2010, 10:36
by alsieboy Tue 11 May 2010, 10:36
more goodies arrived today....
A straight fairing brace...been staring at it for ages checking it wasnt bent, the more you look the more you convince yourself that something is wrong, but having got the tape measure out and checked it, it is straight..even in the pic I have took it looks out of shape ..lol!

A straight fairing brace...been staring at it for ages checking it wasnt bent, the more you look the more you convince yourself that something is wrong, but having got the tape measure out and checked it, it is straight..even in the pic I have took it looks out of shape ..lol!
Last edited by alsieboy on Tue 11 May 2010, 10:43; edited 1 time in total
alsieboy- MotoGP Legend
- Number of posts : 1936
Age : 56
Location : Pontypool
My bike(s) : CBR900RR Urban Tiger, Subaru Impreza WRX STI Type UK
Registration date : 2007-08-14
Re: Project Tigger
![]() by alsieboy Tue 11 May 2010, 10:39
by alsieboy Tue 11 May 2010, 10:39
oh and a bag of fairing brackets for a tenner...
but looking at it, I think he has thrown in every bracket not just the fairing, looks like the seat panel brackets too..

but looking at it, I think he has thrown in every bracket not just the fairing, looks like the seat panel brackets too..
alsieboy- MotoGP Legend
- Number of posts : 1936
Age : 56
Location : Pontypool
My bike(s) : CBR900RR Urban Tiger, Subaru Impreza WRX STI Type UK
Registration date : 2007-08-14
Re: Project Tigger
![]() by alsieboy Fri 21 May 2010, 12:42
by alsieboy Fri 21 May 2010, 12:42
had a good day yesterday so had a fiddle with the bike....had the forks checked and the good news is they are straight, he losened the yolks and re-tightened to correct any slight movement that may have taken place and the scuff just t-cutted off the legs. Happy Dayz..
The clock bracket looks well buckled..


removed the remains of the damaged bodywork..

Screen is too scratched to be salvagable so will have to find another..

Can't beleive this inner fairing panel survived undamaged..

And the fuse box cover is un-damaged, more savings

Managed to strip out the bracketry..

Clock/fairing bracket had to be hackd up to release the wiring..

Fairing brace is scrap, but I got a new one..

Radiator was beyond salvation


And the fan housing was buckled

But the grill was intact and un damaged

New radiator in with second hand fan and original grill back in place

Clock/fairing bracket in with wiring re-routed and clocks installed


Getting there slowly........
The clock bracket looks well buckled..
removed the remains of the damaged bodywork..
Screen is too scratched to be salvagable so will have to find another..
Can't beleive this inner fairing panel survived undamaged..
And the fuse box cover is un-damaged, more savings
Managed to strip out the bracketry..
Clock/fairing bracket had to be hackd up to release the wiring..
Fairing brace is scrap, but I got a new one..
Radiator was beyond salvation
And the fan housing was buckled
But the grill was intact and un damaged
New radiator in with second hand fan and original grill back in place
Clock/fairing bracket in with wiring re-routed and clocks installed
Getting there slowly........
alsieboy- MotoGP Legend
- Number of posts : 1936
Age : 56
Location : Pontypool
My bike(s) : CBR900RR Urban Tiger, Subaru Impreza WRX STI Type UK
Registration date : 2007-08-14
Re: Project Tigger
![]() by fastbikefinder Sat 22 May 2010, 14:46
by fastbikefinder Sat 22 May 2010, 14:46
You've got a bit of dirt on the side stand foot.

fastbikefinder- MotoGP Legend
- Number of posts : 4582
Age : 46
Location : Muddy Fenland
My bike(s) : Trek VX with suspenders & Specialized Hemi
Registration date : 2007-11-23
Re: Project Tigger
![]() by rapid777 Mon 31 May 2010, 00:15
by rapid777 Mon 31 May 2010, 00:15
You will soon have the tiger up and running ;o)

rapid777- BSB Racer
- Number of posts : 463
Age : 46
Location : norway
My bike(s) : HONDA SC28
Registration date : 2009-03-31
Re: Project Tigger
![]() by Fringe Mon 31 May 2010, 11:09
by Fringe Mon 31 May 2010, 11:09
Great to see ya progress Alsie.
Are you recoverng too?

Are you recoverng too?

Fringe- MotoGP Legend
- Number of posts : 1036
Age : 59
Location : Stockport, Cheshire
My bike(s) : Fightered RRS
Registration date : 2007-07-26
www.firebladeriders.org :: Fireblade Knowledgebase and Tech Help :: Projects/Streetfighters/Modifications
Page 1 of 1
Permissions in this forum:
You cannot reply to topics in this forum|
|
|